Ready to upload your images to FolioLink or getting ready to submit files to a photo contest or art competition? Here is some advice that can help you.
Image Resolution
No two images will compress the same. There is no perfect rule as to what setting to use for compression. In general, for optimum load times online, keep your files at or below 350 KB. Large pixel dimension files or images with a lot of detail will naturally require a larger KB size. Just be sure to optimize the files as best you can. Here are a few tips and tricks we use with PhotoShop to get the best image resolution.
Step By Step…
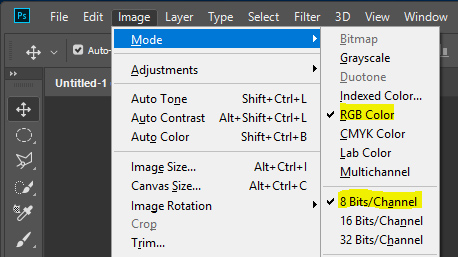
- Open a copy of the original image in Photoshop and change its Image Mode to RGB and 8 bits
- In Photoshop click on Image and then go to Image Size. Make sure “Resample Image” is checked to have access to the Pixel Dimensions box. Enter an image width and height that fits the maximum allowed size for your purpose. If your image is tall specify the height first. Otherwise, specify the width first. Once you enter in one dimension, Photoshop will automatically adjust the other dimension in order to maintain the original image proportions. If the resulting dimension is larger than the limits you are working with then change the original dimension again until PhotoShop’s suggested size is within the maximum recommended sizes. Are you wondering about DPI? We get that a lot, but you don’t have to worry about adjusting the Dots Per Square Inch (DPI) for your files. Monitors don’t care about your DPI setting. DPI only comes into play for images you will be printing, and that is another conversation. We are focused on online image resolution.
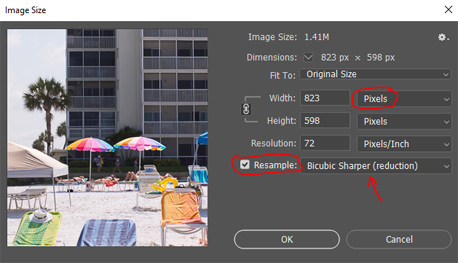
- Select "Bicubic sharper" as the scaling algorithm option.
- If the resulting image is soft, go to the Filter menu and select Sharpen.
- Then select Unsharp Mask.
- The Radius should be .5, Threshold should be 0, and change the percentage amount to taste while previewing the image. Make sure the image does not look over sharpened.
- Go to the File menu and depending on your Photoshop version either select Export Save for Web (legacy) or Save for Web.
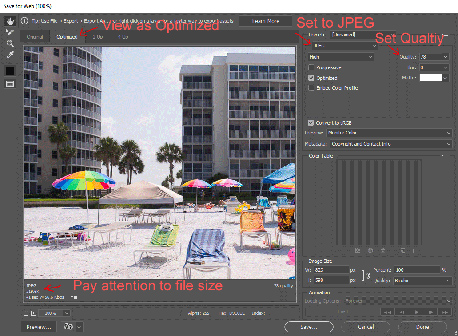
- Set the Quality to the lowest possible setting that shows an image without strange artifacts. Lowering what Photoshop unfortunately calls “quality” is in fact what allows you to reduce the size of an image otherwise known as optimizing an image.
- The estimated resulting file size is displayed in the lower corner. Note that file size is measured in Kilobytes or Megabytes (KB or MB) and this number is not the same as pixel dimensions. If the estimated file size is larger than the maximum recommended for web images (i.e. larger than 450KB) you can return to the previous step and lower the Quality setting. If your image has a lot of detail it may be necessary to introduce softness to reduce file size without introducing compression artifacts as described in the next optional step. When you are ready to save the file make sure SRGB is selected.
- Optional step. Use the Blur slider located in the Save for Web window and move it to the right while previewing your image. The more you move the blur slider to the right, the more blurred your image will become, and the smaller the resulting file. Only use this step if you were not able to get an acceptable file size in the previous step. Stop adding blur when the preview image you reach is an acceptable estimated file size.
- Notes: Every image compresses differently based on its contents. In order to get the best image resolution, you should try different settings for different images. Faces and skies benefit from a modest amount of blur factor. In general, images that have a lot of texture and contrast are harder to compress. For the most compression skip the sharpening step above.
- Image optimization is a bit of an art that requires finding the perfect balance of all of these settings for each image. Creating a colorful, detailed and fast loading image is what you are trying to achieve and setting the Save for the Web Quality to 100% is almost never the way to get there. Following these tips, should help you achieve the best image resolution and a well optimized file.
One topic we did not cover in this overview is color. If your resulting file does not have the same color as your original file contact us for our color management article.
Don't want to go it alone? Our staff can help by answering questions or you can request information about our image optimization service.
Please contact us by calling our Toll-Free Number or by emailing us.
Email:info(@)foliolink.com
Overview
More
Contact Us
- Sales & Support : 1-877-863-6546 (toll Free USA)
- Sales & Support Int'l: 703-506-0878
- Subscribe to Newsletter
- Blog